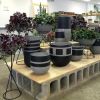

Everybody likes cement – it’s easy to use, cheap, and after all the hard work, you see a unique planter which looks very nice. This tutorial is an easy one which helps you to make a pot for using in your own garden.
You should prepare:
- Cement
- An old Bucket
- Canola Oil
- Stir Sticks
- Paper Cartons
- Polyethylene Sheet
- Potted Plants
- Disposable Gloves
Tools:
- Scissors
- Pliers
Step 1: Molds
You will need molds for the planters, so find some containers. There are two sizes of molds: The inner mold has to hold your plant or flowers, and the outer mold has the same shape as the planter.
Step 2: Make the containers
Put a little canola oil on a paper and coat the inside of containers. It’s actually like making a bread, the oil acts as a layer which separates the cement from the plastic and prevent sticking.
Step 3: Mix Cement
Wear gloves and begin to make cement! Since the shape and size of the planters are different from each other, mixing the cement is mostly a guesswork. You can begin with the ratio of cement and water being equal. If the mix feels too dry, add some water.
Step 4: Pour Cement into Container
When the cement mix has the correct consistency, pour the mixture in those plastic containers that you prepared. Pour some oil on the small plastic container’s outside. Sink the container into the mixture to the desired depth.
Step 5: Wait!
Wait 24 hours. This is just an unbearable task!
Step 6: Carefully Remove Cement Planter
After 24 hours passed, take your precious planter out of the container and remove the inner container.
Step 7: Put flowers in
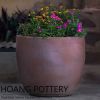
Put some dirt, pebbles for drainage and flowers into the planter. Then enjoy your result!